Article Name: Manage Utilities – Infrastructure
Category/Module: Administration, Institution
Tags: Utilities, Infrastructure
Version: 3.10.13
Date Updated: 30 Nov 2017
This Manage Utilities – Infrastructure feature allows you to:
- Aid Schools in identifying, prioritising, planning and tracking school infrastructure needs and works in addition to associating them with projects and funding.
- Equip Ministry with the information necessary to allocate resources to schools based on need.
- To keep track and manage information and processes across
- Setup Utility Electricity Type (Administration)
- Setup Utility Electricity Conditions (Administration)
- Setup Utility Internet Type (Administration)
- Setup Utility Internet Conditions (Administration)
- Setup Utility Telephone Type (Administration)
- Setup Utility Telephone Conditions (Administration)
- Manage Utility Electricity
- Manage Utility Internet
- Manage Utility Telephone
- Enable Security Role Permission (Administration)
Setup Utility Electricity Type
Create Utility Electricity Type
1) Go to Administration > Field Options > Utility Electricity Types
2) Select Add
3) Enter Name > Save.
4) Successful message will be displayed upon saving.
Edit Utility Electricity Type
1) Go to Administration > Field Options >Utility Electricity Types
2) Go to Actions Bar > Edit
3) Update the Name > Save.
4) System will display a message upon saving successfully.
View Utility Electricity Type
1) Go to Administration > Field Options > Utility Electricity Types
2) Go to Actions Bar > View.
3) You will be able to see additional details of the record.
4) Similarly, you will be able to edit or delete the record.
Delete Utility Electricity Type
1) Go to Administration > Field Options > Utility Electricity Types
2) Go to Actions Bar > Delete.
3) You will not be able to delete if the record have associated records.
4) Else, if there are no associated record > Save.
5) You will be able to delete the record successfully.
Setup Utility Electricity Conditions
Create Utility Electricity Conditions
1) Go to Administration > Field Options > Utility Electricity Conditions
2) Select Add
3) Enter Name > Save.
4) Successful message will be displayed upon saving.
Edit Utility Electricity Conditions
1) Go to Administration > Field Options >Utility Electricity Conditions
2) Go to Actions Bar > Edit
3) Update the Name > Save.
4) System will display a message upon saving successfully.
View Utility Electricity Conditions
1) Go to Administration > Field Options > Utility Electricity Conditions
2) Go to Actions Bar > View.
3) You will be able to see additional details of the record.
4) Similarly, you will be able to edit or delete the record.
Delete Utility Electricity Conditions
1) Go to Administration > Field Options > Utility Electricity Conditions
2) Go to Actions Bar > Delete.
3) You will not be able to delete if the record have associated records.
4) Else, if there are no associated record > Save.
5) You will be able to delete the record successfully.
Setup Utility Internet Type
Create Utility Internet Type
1) Go to Administration > Field Options > Utility Internet Types
2) Select Add
3) Enter Name > Save.
4) Successful message will be displayed upon saving.
Edit Utility Internet Type
1) Go to Administration > Field Options >Utility Internet Types
2) Go to Actions Bar > Edit
3) Update the Name > Save.
4) System will display a message upon saving successfully.
View Utility Internet Type
1) Go to Administration > Field Options > Utility Internet Types
2) Go to Actions Bar > View.
3) You will be able to see additional details of the record.
4) Similarly, you will be able to edit or delete the record.
Delete Utility Internet Type
1) Go to Administration > Field Options > Utility Internet Types
2) Go to Actions Bar > Delete.
3) You will not be able to delete if the record have associated records.
4) Else, if there are no associated record > Save.
5) You will be able to delete the record successfully.
Setup Utility Internet Conditions
Create Utility Internet Conditions
1) Go to Administration > Field Options > Utility Internet Conditions
2) Select Add
3) Enter Name > Save.
4) Successful message will be displayed upon saving.
Edit Utility Internet Conditions
1) Go to Administration > Field Options >Utility Internet Conditions
2) Go to Actions Bar > Edit
3) Update the Name > Save.
4) System will display a message upon saving successfully.
View Utility Internet Conditions
1) Go to Administration > Field Options > Utility Internet Conditions
2) Go to Actions Bar > View.
3) You will be able to see additional details of the record.
4) Similarly, you will be able to edit or delete the record.
Delete Utility Internet Conditions
1) Go to Administration > Field Options > Utility Internet Conditions
2) Go to Actions Bar > Delete.
3) You will not be able to delete if the record have associated records.
4) Else, if there are no associated record > Save.
5) You will be able to delete the record successfully.
Setup Utility Telephone Type
Create Utility Telephone Type
1) Go to Administration > Field Options > Utility Telephone Types
2) Select Add
3) Enter Name > Save.
4) Successful message will be displayed upon saving.
Edit Utility Telephone Type
1) Go to Administration > Field Options >Utility Telephone Types
2) Go to Actions Bar > Edit
3) Update the Name > Save.
4) System will display a message upon saving successfully.
View Utility Telephone Type
1) Go to Administration > Field Options > Utility Telephone Types
2) Go to Actions Bar > View.
3) You will be able to see additional details of the record.
4) Similarly, you will be able to edit or delete the record.
Delete Utility Telephone Type
1) Go to Administration > Field Options > Utility Telephone Types
2) Go to Actions Bar > Delete.
3) You will not be able to delete if the record have associated records.
4) Else, if there are no associated record > Save.
5) You will be able to delete the record successfully.
Setup Utility Telephone Conditions
Create Utility Telephone Conditions
1) Go to Administration > Field Options > Utility Telephone Conditions
2) Select Add
3) Enter Name > Save.
4) Successful message will be displayed upon saving.
Edit Utility Telephone Conditions
1) Go to Administration > Field Options >Utility Telephone Conditions
2) Go to Actions Bar > Edit
3) Update the Name > Save.
4) System will display a message upon saving successfully.
View Utility Telephone Conditions
1) Go to Administration > Field Options > Utility Telephone Conditions
2) Go to Actions Bar > View.
3) You will be able to see additional details of the record.
4) Similarly, you will be able to edit or delete the record.
Delete Utility Telephone Conditions
1) Go to Administration > Field Options > Utility Telephone Conditions
2) Go to Actions Bar > Delete.
3) You will not be able to delete if the record have associated records.
4) Else, if there are no associated record > Save.
5) You will be able to delete the record successfully.
Manage Utility Electricity
Create Utility Electricity
1) Go to Institutions > Utilities > Electricity
2) Select Add.
3) Enter all the required fields such as (Academic Period, Type, Condition). Type, Condition will retrieve all the data entered in Field Options.
4) Select Save, System will display a successful message.
Edit Utility Electricity
1) Go to Institutions > Utilities > Electricity
2) Select Actions Bar > Edit
3) You will be able to edit all the fields > Save.
4) Successful message will be displayed upon selecting Save.
View Utility Electricity
1) Go to Institutions > Utilities > Electricity
2) Select Actions Bar > View.
3) You will be able to see Additional details of Electricity record
4) Similarly, you will be able to update or delete the record.
Delete Utility Electricity
1) Go to Institutions > Utilities > Electricity
2) Select Actions Bar > Delete.
3) System will display a confirmation box that all associated records will be removed.
4) System will display a message upon removing successfully.
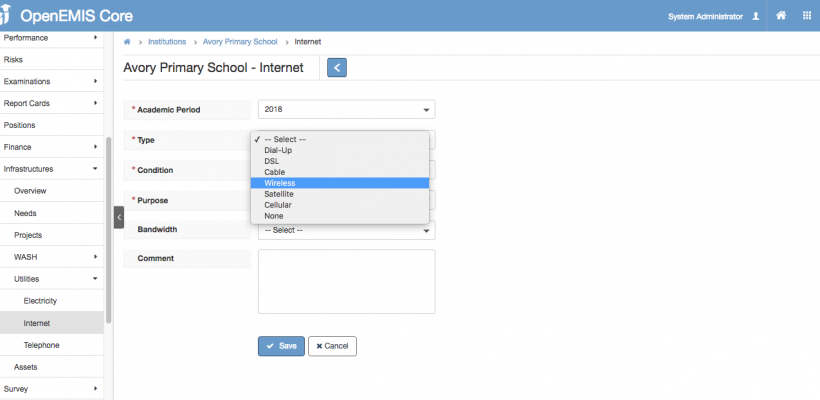
Manage Utility Internet
Create Utility Internet
1) Go to Institutions > Utilities > Internet
2) Select Add.
3) Enter all the required fields such as (Academic Period, Type, Condition). Type, Condition will retrieve all the data entered in Field Options.
4) Select Save, System will display a successful message.
Edit Utility Internet
1) Go to Institutions > Utilities > Internet
2) Select Actions Bar > Edit
3) You will be able to edit all the fields > Save.
4) Successful message will be displayed upon selecting Save.
View Utility Internet
1) Go to Institutions > Utilities > Internet
2) Select Actions Bar > View.
3) You will be able to see Additional details of Internet record
4) Similarly, you will be able to update or delete the record.
Delete Utility Internet
1) Go to Institutions > Utilities > Internet
2) Select Actions Bar > Delete.
3) System will display a confirmation box that all associated records will be removed.
4) System will display a message upon removing successfully.
Manage Utility Telephone
Create Utility Telephone
1) Go to Institutions > Utilities > Telephone
2) Select Add.
3) Enter all the required fields such as (Academic Period, Type, Condition). Type, Condition will retrieve all the data entered in Field Options.
4) Select Save, System will display a successful message.
Edit Utility Telephone
1) Go to Institutions > Utilities > Telephone
2) Select Actions Bar > Edit
3) You will be able to edit all the fields > Save.
4) Successful message will be displayed upon selecting Save.
View Utility Telephone
1) Go to Institutions > Utilities > Telephone
2) Select Actions Bar > View.
3) You will be able to see Additional details of Telephone record
4) Similarly, you will be able to update or delete the record.
Delete Utility Telephone
1) Go to Institutions > Utilities > Telephone
2) Select Actions Bar > Delete.
3) System will display a confirmation box that all associated records will be removed.
4) System will display a message upon removing successfully.