Article Name: Meals
Category/Module: Administration, Institution
Tags: Meals
Version: 3.75.21
Date Updated: 15 Aug 2022
This Meals feature allows you to:
- Record meals given to students
- View summary of Student Meals
- Record nutritional content for Meal Programs
- Meals Setup (Administration)
- Manage Meal Distributions
- Manage Student Meals
- Enable Security Role Permission (Administration)
Meals Setup (Administration)
Meal Types
1) Go to Administration > System Setup > Field Options, Choose Meals: Meal Types
2) Select Add

3) Fill in the necessary fields.
4) Click the save button.

5) Successful message will be displayed upon saving.

Meal Targets
1) Go to Administration > System Setup > Field Options, Choose Meals: Meal Targets
2) Select Add

3) Fill in the necessary fields.
4) Click the save button.

5) Successful message will be displayed upon saving.

Meal Nutritions
1) Go to Administration > System Setup > Field Options, Choose Meals: Meal Nutritions
2) Select Add

3) Fill in the necessary fields.
4) Click the save button.

5) Successful message will be displayed upon saving.

Meal Implementers
1) Go to Administration > System Setup > Field Options, Choose Meals: Meal Types
2) Select Add

3) Fill in the necessary fields.
4) Click the save button.

5) Successful message will be displayed upon saving.

Meal Benefit Types
1) Go to Administration > System Setup > Field Options, Choose Meals: Meal Benefit Types
2) Select Add

3) Fill in the necessary fields.
4) Click the save button.

5) Successful message will be displayed upon saving.

Meal Programmes
1) Go to Administration > Meals
2) Select Add

3) Enter all the required fields such as (Academic Period, Code, Name, Targeting, Start Date, End Date, Cost and Institution).

4) Successful message will be displayed upon saving.

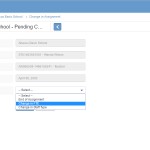
Manage Meals Distributions
Add Meals Distributions
1) Go to Institutions > Meals > Distributions.
2) Select Add

3) Enter all the required fields such as (Academic Period, Meal Programmes, Quantity Received, Delivery Status and Date).
4) Select Save

5) System will display a successful message.

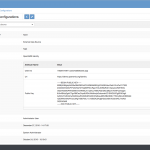
Edit Meals Distributions
1) Go to Institutions > Meals > Distributions
2) Select Academic Period, Meal Programmes and Week. Select Actions Bar > Edit

3) You will be able to edit the fields > Save.

4) Successful message will be displayed upon selecting Save.

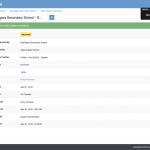
View Meals Distributions
1) Go to Institutions > Meals > Distributions
2) Select Academic Period, Meal Programmes and Week. Select Actions Bar > View.

3) You will be able to see Additional details of Meal Programmes.

4) Similarly, you will be able to update the record.
Delete Meals Distributions
1) Go to Institutions > Meals > Distributions
2) Select Academic Period, Meal Programmes and Week. Select Actions Bar > Delete.

3) The system will notify that associated records will be deleted.
4) If there are no associated record or you want to remove the records, click Save.

5) You will be able to delete the record successfully.

Manage Student Meals
Add Student Meals
1) Go to Institutions > Meals > Students
2) Choose filter such as (Academic Period, Week, Day, Class, Meal Programmes).
3) Select Edit.

4) Indicate Meal Received next to Student’s name. Select “Received”, or ” Not Received”.

5) System will save records automatically after user has selected one of the options.
Edit Student Meals
1) Go to Institutions > Meals > Students
3) Choose filter such as (Academic Period, Week, Day, Class, Meal Programmes).
2) Select Edit.
3) You will be able to edit selected options.


5) System will save records automatically after user has edited options.
Import Student Meals
1) Go to Institutions > Meals > Students
2) Select Import Student Meals icon at the top of page.

3) Select Class
4) Click the Download Icon on the left. The Import template will be downloaded.

5) Use the download template to fill in required fields such as (Date, OpenEMIS ID, Meal Programme Code, Meal Received Code and Meal Benefit Name.
(Look at the reference tab if you are unsure of values in the dropdown list.)

6) After completing and saving the download template, go back to the Import page, click the Folder Icon on the right to select completed template. Click the Import button to Upload.

7) Import will be successful if required fields are filled in and records are correct.

Export Student Meals
1) Go to Institutions > Meals > Students
2) Select Export Student Meals.

3) System will generate and download Student Meal records.

Enable Permission for Meals
Enable Security Role Permissions for Meals
1) Go to Administration > Security > Roles
2) Select on the Security Role and Allow all the Permission for the following actions.