Article Name: Survey
Category/Module: Administration
Tags: Questionaire, Survey
Version: 3.98.7
Date Updated: 4 Jan 2024
The Survey module allows you to setup and configure the survey template. Which will be used to collect data on a institution level, for analysis and reporting.
You will be able to download the surveys once it has been made available.
- Adding Questions
- Text Type Questions
- Number Type Questions
- Decimal Type Questions
- Textarea Type Questions
- Dropdown Type Questions
- Checkbox Type Questions
- Table Type Questions
- Date Type Questions
- Time Type Questions
- Student List Type Questions
- Coordinates Type Questions
- File Type Questions
- Repeater Type Questions
- Note Type Questions
- Staff List Type Questions
- Adding Surveys (Form)
- Rules
- Filters
- Status
- Recipient
Text Type Questions

1) Go to Administration > Survey > Forms
2) Select ‘Add’ button
3) Fill up the fields.
4) You may add a length validation if you want to restrict the length of the answer.
5) Or you may choose to add a custom validation (eg. Nationality No)
6) Select Save.
Number Type Questions

1) Go to Administration > Survey > Forms
2) Select ‘Add’ button
3) Fill up the fields.
4) You may add validation rule, which consists of the following rules: (No Validation, Should not be lesser than, Should not be greater than, In between (inclusive))
5) Select Save.
Decimal Type Questions

1) Go to Administration > Survey > Forms
2) Select ‘Add’ button
3) Fill up the fields.
4) You can enter the Length and Decimal Place desired.
Textarea Type Questions

1) Go to Administration > Survey > Forms
2) Select ‘Add’ button
3) Fill up the fields.
4) Select Save.
Dropdown Type Questions

1) Go to Administration > Survey > Forms
2) Select ‘Add’ button
3) Fill up the fields.
4) Select Add in the options section to configure the dropdown values.
5) Select Save
Checkbox Type Questions

1) Go to Administration > Survey > Forms
2) Select ‘Add’ button
3) Fill up the fields.
4) Select Add in the options section to configure the dropdown values.
5) Select Save
Table Type Questions

1) Go to Administration > Survey > Forms
2) Select ‘Add’ button
3) Fill up the fields.
4) Select Add Rows and Columns for the user to fill up the data based on the fields specified.
5) Select Save
Date Type Questions

1) Go to Administration > Survey > Forms
2) Select ‘Add’ button
3) Fill up the fields.
4) Select Save
Time Type Questions

1) Go to Administration > Survey > Forms
2) Select ‘Add’ button
3) Fill up the fields.
4) Select Save
Student List Type Questions

1) Go to Administration > Survey > Questions.
2) Select Add.
3) Select the Field Type which caters to the question you want to add to the student list.
4) Select Save.


5) Go to Administrations > Surveys > Forms
6) Ensure that the dropdown for Custom Module is: Institution > Students
7) Add the question which you have created earlier.
8) Select Save.

9) Go back to the Questions tab, create another question with Student List Field Type.
10) Select the Survey Form which we have created earlier in Institution > Students Custom Module.
11) Select Save.

12) Go back to Forms tab. Select Institution under Custom Module Field.
13) Select the Student List Field Type question that was created earlier.
14) Select Save.

15) Go to Filters tab. Add a filter for the newly created Survey Form.

16) Go to Status tab. Add a status for the newly created Survey Form.

17) Go to Institutions > Survey > Forms to view the form you have created.
Coordinates Type Questions

1) Go to Administration > Survey > Forms
2) Select ‘Add’ button
3) Fill up the fields.
4) Select Save
File Type Questions

1) Go to Administration > Survey > Forms
2) Select ‘Add’ button
3) Fill up the fields.
4) Select Save
Repeater Type Questions

1) Go to Administration > Survey > Forms
2) Select Add button
3) Ensure that the dropdown for Custom Module is: Institution > Repeater
4) Select Save.

5) Create a Repeater Question > link it to the Repeater Form.

6) Go to Administrations > Surveys > Forms and create a Form
7) Add the question which you have created earlier.
 7) Create a filter for the Form, so that you will be able to view on Institution Module, which can be found in Administration > Survey > Forms > Filters

8) Enable the Survey for the Form, so that you will be able to view on Institution Module, which can be found in Administration > Survey > Forms > Status

9) Now, go to Institutions > Survey > Form, you will be able to view/edit the survey
Note Type Questions

1) Go to Administration > Survey > Forms
2) Select ‘Add‘ button
3) Fill up the fields.
4) Select Save.
Staff List Type Questions

1) Go to Administration > Survey > Questions.
2) Select Add.
3) Select the Field Type which caters to the question you want to add to the staff list.
4) Select Save.


5) Go to Administrations > Surveys > Forms
6) Ensure that the dropdown for Custom Module is: Institution > Staff
7) Add the question which you have created earlier.
8) Select Save.

9) Go back to the Questions tab, create another question with Staff List Field Type.
10) Select the Survey Form which we have created earlier in Institution > Staff Custom Module.
11) Select Save.

12) Go back to Forms tab. Select Institution under Custom Module Field.
13) Select the Staff List Field Type question that was created earlier.
14) Select Save.

15) Go to Filters tab. Add a filter for the newly created Survey Form.

16) Go to Status tab. Add a status for the newly created Survey Form.

17) Go to Institutions > Survey > Forms to view the form you have created.
Adding Surveys
Institutions
1) Go to Administration > Survey > Forms
2) Select Forms tab > Add
3) Select Institutions as Custom Module, enter the name, and the questions to the Survey Form.
4) Select Save.
5) This form will then appear in the Institutions > Survey module.
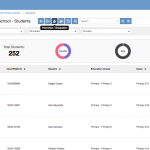
Institutions > Students
1) Go to Administration > Survey > Forms
2) Select Forms tab > Add
3) Select Institution > Student as Custom Module, enter the name, and the questions to the Survey Form.
4) Select Save.
5) This form is for Student List Questions, where you are retrieving information from Institution > Students.
Institutions > Repeater
1) Go to Administration > Survey > Forms
2) Select Forms tab > Add
3) Select Institution > Repeater as Custom Module, enter the name, and the questions to the Survey Form.
4) Select Save.
5) This form is to repeat Questions in a survey.
Institutions > Staff
1) Go to Administration > Survey > Forms
2) Select Forms tab > Add
3) Select Institution > Staff as Custom Module, enter the name, and the questions to the Survey Form.
4) Select Save.
5) This form is for Staff List Questions, where you are retrieving information from Institution > Staff.
Rules

1) Go to Administration > Survey > Forms
2) Select Rules tab.
3) Select on the Edit icon.


4) You will be able to see the questions listed in the survey.
5) As for Question 5, which is a drop-down list as shown in the screenshot.
6) You will be able to see in the options for Question 6, this would mean that if the value for Question 5 is selected, then Question 6, would appear in the survey.
7) Select the Value to trigger for Question 6.
8) Make sure the checkbox is selected, this would mean that the rule is enabled.
9) To test the rule, you may go to Institutions > Survey > Edit.
Filters

1) Go to Administration > Survey > Forms
2) Select on the Filters tab.
3) Select on the Add icon.

4) Select and enter the mandatory and necessary fields > Save
5) Now, you will be able to view the survey filters under Institutions > Survey, if its within the enabled period and the survey filters
Status

1) Go to Administration > Survey > Forms
2) Select on the Status tab.
3) Select on the Add icon.

4) Enter the Date Enabled and Disabled, and the Academic Year > Save.
5) Now, you will be able to view the survey under Institutions > Survey, if its within the enabled period.
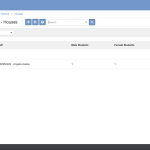
Recipient

The list of recipient depends on the filters and status set accordingly to configured. Based on the screenshot above you can see that institutions that have primary level is shown in the list.