Article Name: Promote Students
Category/Module: Institution
Tags: Institution
Version: 3.98.12
Date Updated: 6 Feb 2024
Purpose:
To promote students to the new academic year by bulk/individually
Before performing promotions, the following should be completed:
- The new academic year is setup (This is configurable under Administration)
- The school’s shift(s) is set up for the new academic year (This is configurable under Administration) or (General>Shifts)
- The school’s academic programme has been set for the new academic year (This is configurable under Administration) or (Academic > Programmes)
- The classes are set up for the new academic year (Academic>Classes).
Bulk Promote

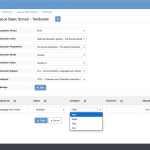
Step 1: Go to Institutions > Students > Promotion/Repeating/Graduation.
The fields are:
- From Academic Period – the academic year you are re-enrolling from.
- To Academic Period – the academic year you are re-enrolling into.
- From Grade – the grade you are re-enrolling from.
- Class – if Classes were set up for the year you are promoting from, then you choose the class you are re-enrolling from. If no classes then ‘Students without Class’.
- Status – The option Promoted, Repeat or Graduated will display dependent on whether the next grade is within or at the end of a programme.
- To Grade – field options are based on the previous ‘From Grade’ and ‘Status’ selection.
- Next Class – field options will only be available if the Classes for the new academic year have been set up. Choosing a class will set the default class for the next enrolment.
- Students – list of students that are in the selected ‘From Grade’ and ‘Class’ to select from. Click the box in the student table title to select all students, then optionally unselect some. Or click the boxes next to the individual students to select a few students. Optionally set ‘Next Class’ values against the individual student to overwrite the default next class value.
After a field value selection, the tab shows the reload icon, indicating that you wait for the form reload to complete. The reload icon is updating the next field options based on your selection.

Step 2: Select the options accordingly. Click “Next”.

Step 3: Review the information before confirming changes. You may save as draft and return back to this page again.
* Save draft feature is only available in Bulk Promote.

Students’ status in the previous Academic Period will appear as “Promoted”.

Students’ status in the next Academic Period will appear as “Enrolled”.
Individual Promote

Step 1: Go to Institutions > Students > General > Promotion/Repeat.

Step 2: Select the options accordingly. Click “Next”.

Step 3: Review the information before confirming changes.

Student has been promoted.